UV mapping in Blender
UV mapping is the process of taking 3D geometry (faces, edges, vertices) and translating their coordinates onto a 2D image, allowing you to add textures and materials to a model.
When you UV map an object, there are two main things you want to consider:
- Minimizing stretching, to reduce warping of textures on the model
- Making the UV islands intuitive, to make life easier for the texture artist (possibly you)
Sometimes these goals conflict with each other. Personally, I skew towards the intuitive end, as I (and the people who use my models) generally do not mind if a texture job comes out a little warped.
Tools used
- Blender (As in, the 3D modeling software)
- I use 4.0, but any version that has these features will work
Techniques
0. Modeling for UV mapping
When I create models I intend to create textures for, I take into consideration what the UV mapping process will look like. Some shapes are easier to map than others.
For example, cubes and cylinders are very easy to map, so I like to work in subdivided cubes (and a cylinder is similar to a cube!) Another example are "complex" shapes that are actually just a flat shape that gets extruded. These are also fairly easy to map.

Topology is not critically important for texturing in my opinion - that's more of an issue for the "rigging and skinning" crowd. However, keeping everything as neat quads makes it a lot easier to select many faces (edge loops) while UV mapping.
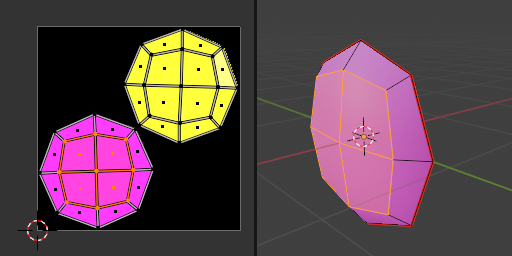
Ironically, I actually think UV spheres are kind of tricky to UV map, especially if you want the "poles" of the sphere to be seamless, for the same reason that maps of the world always come out a little warped. You can actually turn cubes into spheres very easily using the "To Sphere" transform option, found in Mesh -> Transform -> To Sphere, or by hitting Shift + Alt + S.
1. Useful UV mapping-related features
UV Sync Selection
Found in the UV editor viewport, near your geometry selection settings:
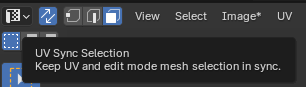
This option makes it so that any geometry that you select in the UV editor pane will be also selected in the Edit Mode 3D viewport, and vice versa. This is great for finding what part of the UV map corresponds to which geometry.
Pack Islands
Found in the UV editor viewport, under the "UV" dropdown:

This will rotate and/or scale all islands that you have currently selected in the UV editor to fill the space as much as possible.
I recommend turning "spacing" up until there are visible gaps between islands and each other / the edges of the UV map. Just in case pixels need to bleed out of your UV islands, this spacing prevents the pixels from overlapping other islands.
This resizing will happen based on relative sizes. So if you want certain islands to be bigger than others in the UV, resize them before you perform "pack islands"!
Display Stretch
Found in the UV editor viewport, under Overlays (top right usually):
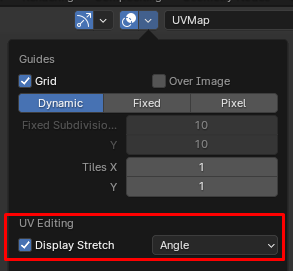
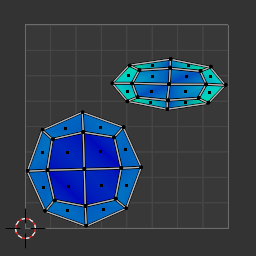
Like the name suggests, this option shows you how stretched certain faces are in your UV map, giving you an idea of what areas on the map might need more seams. If it's yellow or orange, watch out!
2. Where do I place seams?
Any enclosed shapes that get UV mapped must have seams, otherwise there will be too much stretching. Seams reduce stretching for the surrounding area, but they also add a point of inconvenience - namely, it will break up the texture and make it harder to align textures across the seam. So if you want a part of a mesh to look seamless, avoid putting a seam there!
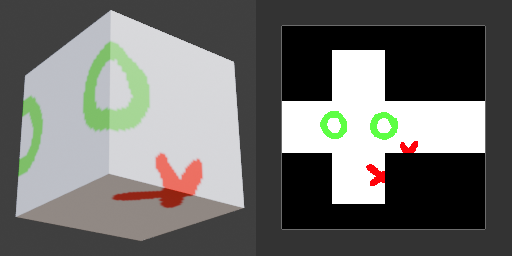
Personally, I like to put seams that are "out of the way". If a model is meant to be looked at from the front or above, I put the seams on the back or bottom. "Inside" edges are also a good place to put them. This allows the texture artist to have more connected space to work with in areas that are more visible.
Take the humble cube for example:
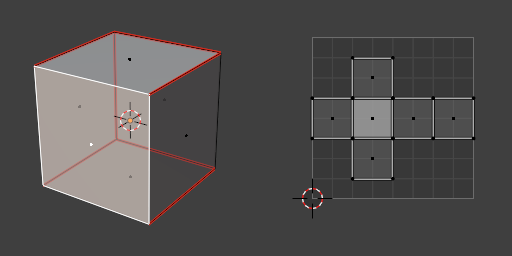
In this example, the cube's front face connects to the sides, top, and bottom, which makes it easy to texture the cube from the front and paint over to each adjacent side. However, this is also less intuitive if you wanted to cross from a "side" face to the bottom, or from the back to the bottom, for example.
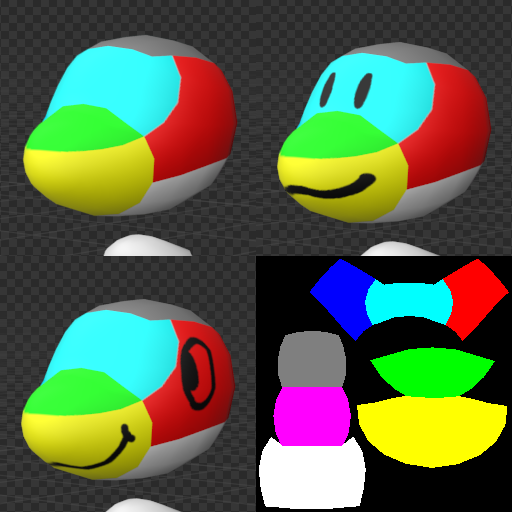
I have another example, this muzzled head I made for a friend's modular game avatar kit. For this one, I took into account different ways that a texture artist might utilize the faces - putting eyes on the front or sides, or having a mouth that crosses the front or bottom.
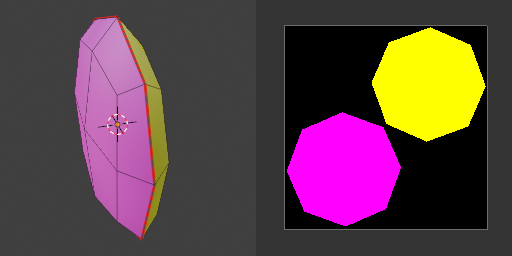
Finally, I have an example of a subdivided cube that is kind of squashed so it looks like it has a "front" and "back" side, maybe for a pin button or something. For something like this, it's fair game to just mark the seam right down the middle, and now you can easily edit both the front and back sides quite straightforwardly.
3. Making faces rectangular
Sometimes you have an object that is "cube-like" or "cylinder-like", but it's all resized so the UV maps come out all bendy. You might opt to make the faces of the UV map rectangular to make it easy to edit.
- Pick a random face to be your "active" face.
- Turn the face into a rectangle by resizing the edges (S + X + 0, S + Y + 0, etc.)
- Select all faces in the island (or the whole mesh, it doesn't matter)
- Under "UV" in the 3D Viewport, click "follow active quads"
4. Stitching separate islands
You might notice in the previous example, the "ends" of the object are also made rectangle, but this isn't always desirable. In this case, I like to re-unwrap the ends of the object in order to keep their shape, but this detaches it from the object's island.
You can stitch two islands together by selecting two edges (or one edge, if you have UV syncing on, which selects "both sides" of the edge) and hitting Alt + V, or using "Stitch" in the UV dropdown in the UV editor.
I recommend resizing the island(s) you're stitching together so that the edges that are going to be stitched are similar sizes, to reduce warping.